# 序
这是一个非常基础的 redux 教程,在我学 redux 时,发现无论是官方文档还是其他的博客,均会先讲一堆 redux 的设计思想,然后抛出一堆新概念看着脑壳疼,所以我打算写一篇非常基础的教程,没有花里花哨的,只是讲讲最简单的使用,至于思想啥的,掘金一搜一大把啦。所以这篇文章只是追求用最简单的例子来介绍 API,不会讲的太深,就酱。
# redux
redux 和 react 没有太大的关系,它只是一个单独的库,你可以随便在哪个地方使用它,它的主要用途我觉得有两点
- 便于多组件跨级间共享数据
- 便于提供规范统一的数据源管理
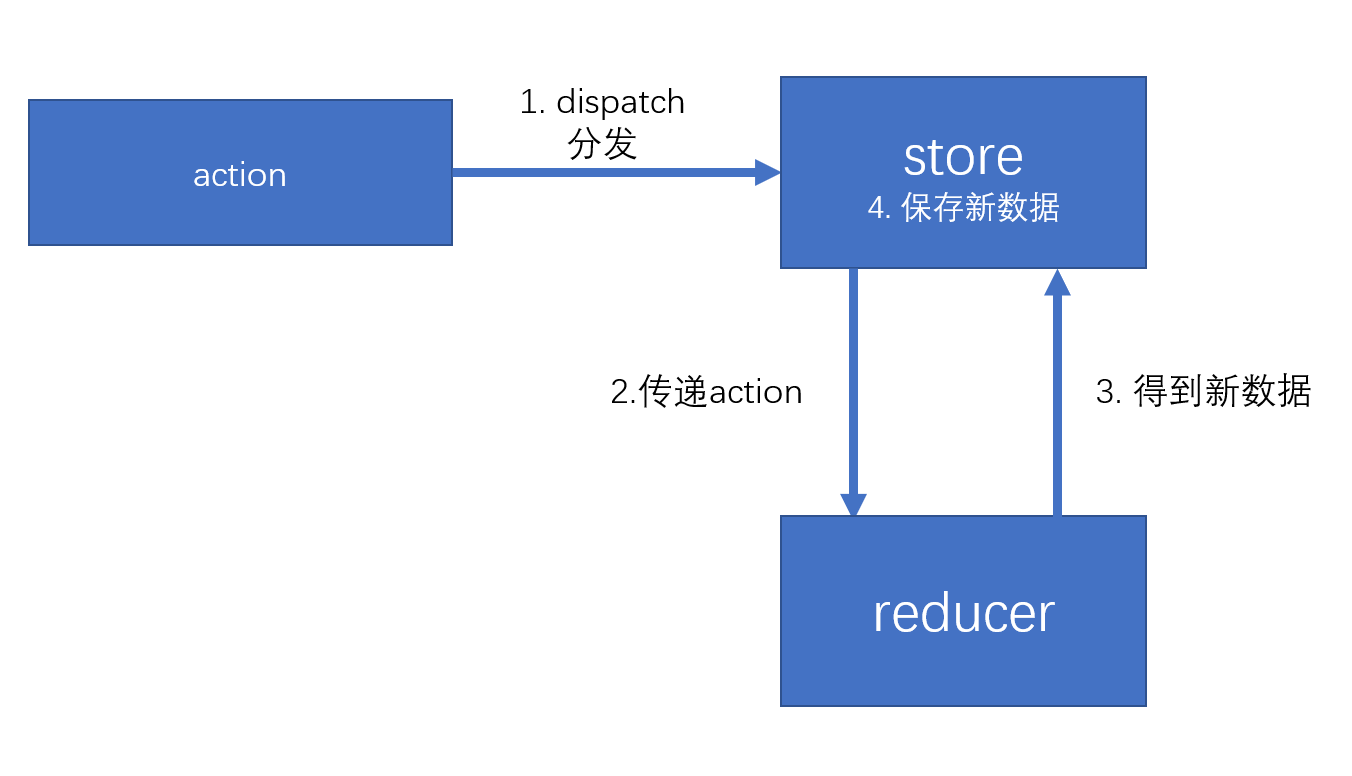
先用一张图介绍 redux 中的几个重要角色

- store:顾名思义,是用来保存数据的
- action:redux 不允许直接操作数据,修改仓库的数据需要派发一个 action,这个 action 用于标识怎么修改数据
- reducer:reducer 用于根据 action 的类型来对数据进行具体的处理
我们来看一个简单的例子
import {createStore} from "redux"; | |
function reducer(state, action) { | |
let newState = { | |
...state | |
} | |
// 根据 type 对状态进行处理 | |
switch (action.type) { | |
case "add": | |
newState.num++ | |
break; | |
default: | |
break; | |
} | |
// 返回新的状态 | |
return newState; | |
} | |
// 创建仓库 | |
let store = createStore(reducer, { | |
num : 0 | |
}); | |
// 数据更新时触发的回调 | |
const handleStoreUpdate = function () { | |
console.log(store.getState()); | |
} | |
// 注册数据更新时触发的函数 | |
store.subscribe(handleStoreUpdate); | |
setTimeout(() => { | |
// 派发 action 修改数据 | |
store.dispatch({ | |
type : "add" | |
}) | |
}, 1000) |
在使用过程中,先通过 createStore 创建一个 store,传入的两个参数依次是 reducer (也就是具体根据 action 处理数据的方法) 和 state 的默认值
然后通过 store.subscribe 订阅 state 的变化
最后我们可以通过 store.dispatch 派发 action,派发的 action 会被传入到 reducer 中进行处理

那么 redux 的简单使用就介绍完了。
# react + redux
这里我们用一个简单的例子来介绍使用,我们要做一个可以通过按 + 或 - 来控制上方显示的计数器
# 安装 react-redux
要把 react 和 redux 结合起来,我们要使用一个库 react-redux
安装: npm install react-redux --save
# 配置 store
const reducer = function (state, action) { | |
let num = state.num; | |
switch (action.type) { | |
case "increase": | |
num++; | |
break; | |
case "decrease": | |
num--; | |
break; | |
default: | |
break; | |
} | |
return { | |
...state, | |
num | |
} | |
} | |
let store = createStore(reducer, {num : 0}); |
# 在外围组件中配置 Provider
在这里我们在根组件中中配置 Provider,也就是把 Counter 组件放到 redux 的上下文中
import React from 'react'; | |
import ReactDOM from 'react-dom'; | |
import {store} from "./redux/index.js"; | |
import {Provider} from "react-redux"; | |
import Counter from "./components/Test"; | |
const rootElement = document.getElementById('root'); | |
const renderElement = ( | |
<Provider store={store}> | |
<Counter/> | |
</Provider> | |
); |
# 使用 connect 对 redux 的组件进行包装
import React from "react"; | |
import {connect} from "react-redux"; | |
function Counter(props) { | |
return ( | |
<div> | |
<h2>{JSON.stringify(props.num)}</h2> | |
<button onClick={props.increase}>+</button> | |
<button onClick={props.decrease}>-</button> | |
</div> | |
) | |
} | |
function mapStateToProps(state) { | |
return { | |
num : state.num | |
} | |
} | |
function mapDispatchToProps(dispatch) { | |
return { | |
increase() { | |
dispatch({type : "increase"}) | |
}, | |
decrease() { | |
dispatch({type : "decrease"}); | |
} | |
} | |
} | |
let CounterContainer = connect(mapStateToProps, mapDispatchToProps)(Counter); | |
export default CounterContainer; |
这里使用了 connect 这个函数,这个函数在第一次调用时会返回一个高阶组件用于包装组件,如果你不知道什么是高阶组件也不要紧,你只要记住需要连续调用两次就行了,第一次传入两个函数,第二次传入要包装的组件
其中第一个函数 mapStateToProps 用于把 store 中的 state 映射到 props 上,也就是这个函数返回的值会和 props 先进行一次混合再传给我们的 Counter 组件,这样我们的 Counter 组件就可以通过 props 拿到 store 中的内容了
第二个函数 mapDispatchToProps 用于封装要用到的 action,这是为了确保组件里不能乱派发 action,所以集合起来统一管理,同样的,返回的对象同样会和 props 混合后传给 Counter 组件
最后我们把包装后的组件导出就好啦
# react-router + redux
如果我们要把 router 和 redux 中的某些数据进行联动,我们就可以把 router 的数据放到 redux 上。
# 安装
安装必要的库
yarn add react-redux
yarn add react-router
yarn add connected-react-router
# 配置 store
import thunk from 'redux-thunk'; // 这个中间件可以让 action 为函数 | |
import {createBrowserHistory} from 'history'; | |
import {createStore, applyMiddleware, combineReducers} from 'redux'; | |
import { connectRouter, routerMiddleware } from 'connected-react-router'; | |
import { composeWithDevTools } from 'redux-devtools-extension'; | |
export const history = createBrowserHistory(); // 浏览器端应用使用 createBrowserHistory 来创建 history 对象 | |
const initialState = {}; | |
const reducers = combineReducers({ | |
router: connectRouter(history), // 合并 router-redux 联动需要的 reducer | |
}) | |
const store = createStore( | |
connectRouter(history)(reducers), // 使用 connectRouter 包裹 reducer | |
initialState, | |
composeWithDevTools(applyMiddleware(thunk, routerMiddleware(history))) | |
//composeWithDevTools 是调试用的中间件 (如果你不需要可以去掉) | |
//routerMiddleware 让路由通过 dispatch (push ('/url')) 来变化 | |
); | |
store.subscribe(() => { | |
console.log(store.getState()) | |
}) | |
export default store |
# 配置根组件
import React from 'react' | |
import { render } from 'react-dom' | |
import { Provider } from 'react-redux' | |
import { ConnectedRouter } from 'connected-react-router' | |
import "./App.css" | |
import App from './App'; | |
import store from './redux/store'; | |
import { history } from './redux/store'; | |
// 使用 ConnectedRouter 代替 Router,并且将 store 中创建的 history 对象引入 | |
render( | |
<Provider store={store}> | |
<ConnectedRouter history={history}> | |
<App/> | |
</ConnectedRouter> | |
</Provider>, | |
document.querySelector("#root") | |
) |
# 设置 App 组件
import React from 'react' | |
import {connect} from "react-redux"; | |
import {push} from 'connected-react-router'; | |
import {Route, Switch} from 'react-router'; // react-router v4/v5 | |
function A() { | |
return <h1>组件A</h1> | |
} | |
function B() { | |
return <h1>组件B</h1> | |
} | |
function App(props) { | |
return ( | |
<> | |
<Switch> | |
<Route path="/b" component={B} /> | |
<Route path="/a" component={A} /> | |
</Switch> | |
<div className={"button-box"}> | |
<button onClick={props.toA}>A</button> | |
<button onClick={props.toB}>B</button> | |
</div> | |
</> | |
) | |
} | |
function mapStateToProps(state) { | |
return { | |
} | |
} | |
function mapDispatchToProps(dispatch) { | |
return { | |
// 使用 dispath 切换路由 | |
toA() { | |
dispatch(push('/a')) | |
}, | |
toB() { | |
dispatch(push('/b')); | |
} | |
} | |
} | |
export default connect(mapStateToProps, mapDispatchToProps)(App); |
# 测试一下
我们分别点击按钮 A 和 B

可以看到 router 的变化已经被同步到 redux 了